
Lab 1 — Introduction to Bit
In this lab you’re going to practice:
- using the Bit library to draw simple pictures
- practice while loops
Setting up your development environment
We first need to help you setup your development environment. We’ll be using this all semester.
Install PyCharm
PyCharm can be downloaded from https://www.jetbrains.com/pycharm/download/. See our resource page on PyCharm for help.
Create a new project for Lab 1
NOTE: writing code can involve lots of files. It is helpful to organize your files. Keep files for each lab in separate folders to avoid running into trouble.
- Create a new project in PyCharm (File -> New Project)
- Select a folder for that project to live in
- I recommend creating a folder named
cs110 - In it create folders named
labsandprojects - In the
labsfolder, create a folder namedlab1-bit: this will be the PyCharm project folder for Lab 1
- I recommend creating a folder named
Select the project interpreter
When you create a new project in PyCharm, it will ask you which python interpreter you want to use.
Use Conda to manage the environment.
We already created the cs110 environment in Lab 0. We’ll use it again for
Lab 1.
- Select the “Previously configured interpreter” bullet option. Then click the elipses in the box at the far right.
- Select “Conda Environment” and pick the
cs110environment from the drop down. - Check “Make available to all projects”
We will reuse the cs110 python environment for all labs and projects.
Install the packages we need
Open a terminal in PyCharm. There is a tab at the bottom of the PyCharm window named “Terminal”.
In it type (or copy-and-paste):
conda install -y numpy matplotlib pandas pillowThen type this:
pip install byubitNormally all of the packages we install will be in conda, but our BYU Bit library is not there yet.
Run a python script using Bit
Create a file in your project named my_first_bit.py. In this file:
-
import
Bitfrombyubit -
create a bit in a new world that is 5 spaces wide and 3 spaces tall
- the bit will start in the bottom left corner
-
move the bit 3 spaces forward
-
turn the bit to the left
-
move the bit two spaces forward
-
paint the square blue.
-
draw the bit
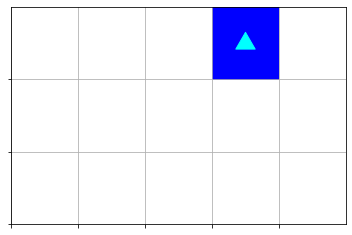
You should have a pattern that looks like this:
Colors
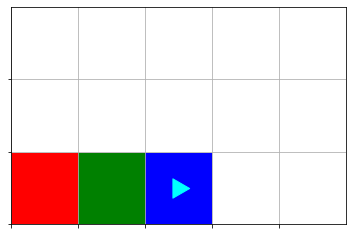
Generate the following pattern:
Draw a picture
- create a new bit world of a size of your choosing
- draw a picture!
- keep it simple for now
- ideas: smile, tree, the letter T
- show it off to the person sitting near you
Go Green!
Create the following pattern using a while loop:
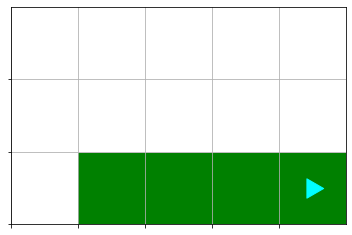
Now color the first square before painting the rest of the row:

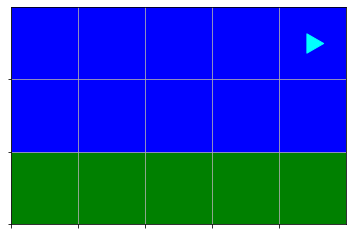
Grass and Sky
Now give our “Go Green!” pattern some sky. Create the following pattern:
Break this down into steps:
- How do I create grass?
- How do I move the bit up to the next row and have it facing in the right direction?
- How do I create a row of sky?
Testing by comparing bits
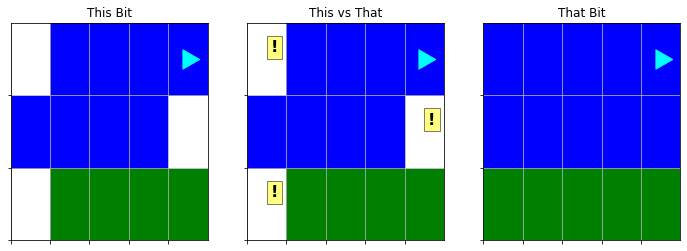
It would be great to be able to test whether our patterns are correct. To do
this, we’re going to put the pattern we want to generate into a file. Create a
file named grass-and-sky.txt and put the following pattern into it:
bbbbb
bbbbb
ggggg
4 2
0
Notice how this shows where blue (‘b’) and green (‘g’) squares are located. The other lines show the position and orientation of the Bit.
Then, instead of bit.draw() at the end of your “grass and sky” script, run:
expected = Bit.load("grass-and-sky.txt")
bit.compare(expected)
Note, you can comment out bit.draw() by putting a # in front of that line.
This will prevent that line from executing.
You should have something like this:

The left side shows you what you did, the right side shows you the correct result, and the middle shows any differenecs.
If you have something more like:
don’t worry!
Use the comparison to see where you might need to tweak your logic.
You did it!
💪🏻
Lessons
What we want you to get from this lab:
-
PyCharm lets you write Python code, similar to Atom. PyCharm has the advantage that it helps you setup your conda environments. It also has a variety of other useful features that we will explore with you later.
-
You can use while loops to control repeated actions in Python. This is a fundamental part of programming that we refer to as “control flow”. It works the same in many other programming languages, so learning how to do it in Python prepares you for programming in a variety of contexts.
-
While loops require a condition, such as moving while the front block is clear. As we program more, you’ll see many different conditions can be used to control how long the while loop executes.
-
Hopefully you had some fun! We’re going to use visual results throughout the course because it makes it easy to see what you created and where you might have gone wrong.
Points
| Task | Description | Points |
|---|---|---|
| PyCharm | Show the TA that you have PyCharm setup with a Conda environment. You can do this by opening a terminal and showing an activated conda environment. | 1 |
| Colors | Show the TA your pattern | 1 |
| Draw! | Show the TA your pattern | 2 |
| Go Green! | Show the TA your pattern | 2 |
| Grass and Sky | Show the TA your pattern | 2 |
| Bit Comparison | Show the TA the result of your test for Grass and Sky | 2 |