
Lab 4 — Playing with images
In this lab, you will modify images by changing their pixels.
Download the lab 4 zip file. Unzip this file and then move
the lab4 folder to your cs110 folder. You should see a set of images there:
- copper.png
- iron.png
- west.png
Inside the lab4 folder, create a file called my_images.py and you will put
all of your code in this file. Each problem will have you write a different
function in this file.
If you haven’t already, after you start the project, using your cs110
environment, install the BYU image library:
pip install byuimageThen at the start of your script, you need to load the BYU image library:
from byuimage import ImageAll of our functions will work on an image in a file. For example, a function
called darken() might look like this:
def darken(filename):
    # load the image, darken it, and then show it
    ...

darken('myimage.jpg')
Remember, each pixel has a red, green, and blue value that varies from 0 to 255. By changing these values, you can change the image:
pixel.red = 0
pixel.green = pixel.green * 0.5
All of our problems will be looping over pixels in image. If you want to modify all pixels in an image, then an easy way to loop over each pixel is:
for pixel in this_image:
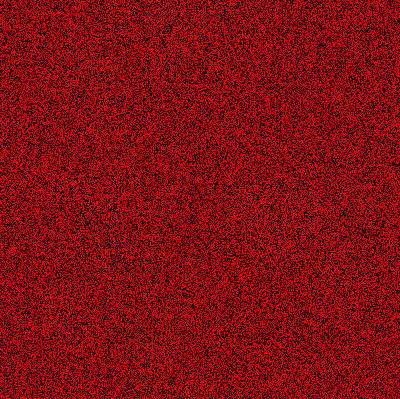
pixel.green = 0Iron Puzzle
This is a puzzle! Use the iron.png file that is in the zip file you
downloaded. Here is what the image looks like:
This picture contains an image of something famous, however the image has been distorted. The famous object is all in blue values, however the blue values have all been divided by 10, so they are too small by a factor of 10. The red and green values are all just meaningless random values (“noise”) added to obscure the real image. You must undo these distortions to reveal the real image.
Your code should look like this:
def iron_puzzle(filename):
    # load the image, solve the puzzle by modifying the image, return the modified image


solution = iron_puzzle("iron.png")
solution.show()
All your code will be in a function called iron_puzzle(). It takes one
parameter, the filename of the image with the puzzle in it.
You will need to loop over all pixels in the image. First, set all the red and green values to 0 to get them out of the way. Look at the result. If you look very carefully, you may see the real image, although it is very very dark (way down towards 0). Now multiply each blue value by 10 scaling it back up to approximately its proper value.
What is the famous object?
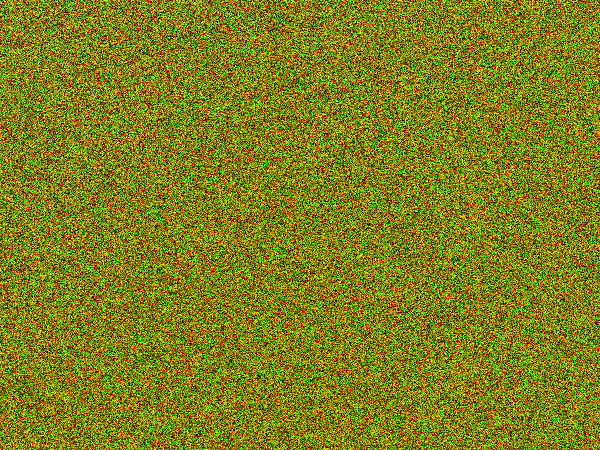
Copper Puzzle
Now that you have some understanding on how to solve these image puzzles, lets
do another one. Use the copper.png file that is in the zip file you
downloaded. It too has been distored:
Write a function called copper_puzzle(filename) to recover the hidden image.
The hidden image is in the blue and green values, however all the blue and green values have all been divided by 20, so the values are very small. The red values are all just random numbers, noise added on top to obscure things. Undo these distortions to reveal the true image.
You should be able to run your code with:
soluton = copper_puzzle("copper.png")
solution.show()
What is the hidden image?
What happens if you fix only the green values or only the blue values?
West
Use the west.png file that is in the zip file you downloaded.
Write a function called west_puzzle(filename) to recover the hidden image.
Use if-else logic along with other pixel techniques to recover the true image. The hidden image is exclusively in the blue values, so set all red and green values to 0. The hidden image is encoded using only the blue values that are less than 16 (that is, 0 through 15). If a blue value is less than 16, multiply it by 16 to scale it up to its proper value. Alternately if a blue value for any pixel is 16 or more, it is random garbage and should be ignored (interpreted as 0). This should yield the recovered image, but all in the blue channel.
Run your function like we have for the previous puzzles.
Darken Image
Enough puzzles! For this problem, write a function that can darken an image an arbitarary amount. The function should be:
def darken(filename, percent):The filename parameter contains the filename of an image to darken, and the
percent parameter tells you how much to darken the image. You should return
the modified image.
Previously we have assumed images were darkened by multiplying the color values by 0.5:
pixel.red = pixel.red * 0.5
pixel.green = pixel.green * 0.5
pixel.blue = pixel.blue * 0.5
For this function, use the percent parameter to control how much the image is
darkened.
Download an image from Unsplash to use for this problem. Unsplash provides free pictures that are legal to use as you want. You should always practice following copyright rules, so use a site like Unsplash instead of Google Images. Skip over the premium images that are shown on Unsplash and use the free ones.
⚠️ Download the small version so your code will run faster (you will have fewer pixels to loop over).
Try darkening with various parameters:
solution = darken("myImage.jpeg", 0.3)
solution.show()
solution = darken("myImage.jpeg", 0.5)
solution.show()
solution = darken("myImage.jpeg", 0.8)
solution.show()
What happens if you use “0” or “1”?
Grayscale
For this problem, write a function called grayscale(filename) that takes the
filename of an image and returns an image that is gray. You can use the same
image you downloaded previously from Unsplash.
To make an image gray, we will use this algorithm:
- loop through all of the pixels
- for each pixel, calculate the average color:
average = (pixel.red + pixel.green + pixel.blue) / 3- set the red, green, and blue pixels equal to the average
You should be able to call your function like this:
gray = grayscale("myImage.jpeg")
gray.show()
Sepia Filter
You have probably used a sepia filter for a photo before. Write a function
called sepia(filename), which takes a filename parameter and returns
modified image that uses a sepia filter.
You will need to loop over all pixels, and then for each pixel, compute these values:
true_red = 0.393*pixel.red + 0.769*pixel.green + 0.189*pixel.blue
true_green = 0.349*pixel.red + 0.686*pixel.green + 0.168*pixel.blue
true_blue = 0.272*pixel.red + 0.534*pixel.green + 0.131*pixel.blue
Then, set each pixel color, for example:
pixel.red = true_redFinally, it may be the case that the color value is greater than 255. So do one last check:
if pixel.red > 255:
    pixel.red = 255
You will want to do this for the red, blue, and green value of each pixel. Be sure to return the image from the function, as we have done for all functions in this lab.
Download an image from Unsplash to test your code. Run your function like we have for the previous problems.
solution = sepia("myImage.jpeg")
solution.show()
Lessons
What we want you to get from this lab:
-
You underestand how to loop over all of the pixels in an image
-
You understand how to modify the red, green, and blue portions of each pixel
-
You feel more confident writing functions that take parameters
-
You can use if statements within loops
-
You think carefully about pre-conditions and post-conditions for functions and loops
-
You can clearly document your functions with docstrings
-
You can figure out what went wrong when something unexpected happens
-
Hopefully you had fun!
Points
| Task | Description | Points |
|---|---|---|
| Iron puzzle | You find the hidden image | 1 |
| Copper puzzle | You find the hidden image | 1 |
| West puzzle | You find the hidden image | 1 |
| Darken Image | Your solution works | 2 |
| Grayscale | Your solution works | 2 |
| Sepia Filter | Your solution works | 2 |
| Documentation | All functions have good docstrings | 1 |