
More grids
Please see the grid reference for what we can do with grids. A quick reference is also below:
# import grid library
from byugrid import Grid

# create a new grid with given width and height -- all cells are `None` initially
grid = Grid(width, height)

# grid width and height
grid.width
grid.height

# every cell has an (x,y) coordinate, starting at (0, 0) in the upper left

# loop over all the columns
for x in range(grid.width)

# loop over all the rows
for y in range(grid.height)

# get the cell contents at coordinate (x, y) -- raises an error if out of bounds
grid.get(x, y)
# set the cell contents at coordinate (x, y) to contain the given value -- also raises an error if out of bounds
grid.set(x, y, value)
# checks if a coordinate is in bounds -- True if in bounds, False otherwise
grid.in_bounds(x, y)
Doctests for grids
It’s easy to write a doctests for a function that returns True or False. For example:
def is_happy(grid, x, y):
    """
    >>> grid = Grid.build([[None, 'p', 'p'], ['p', None, 'p']])
    >>> is_happy(grid, 0, 0)
    False
    >>> is_happy(grid, 1, 0)
    True
"""- Build a grid and store it in a variable
- a grid is just a list of lists
- one list for every row
- Call the function, passing in the grid
- Check the return value
How do we write a doctest for a function that changes the grid? We need to be able to check if the new grid is what we expect.
Let’s work on a function called set_edges():
def set_edges(grid):
    """
    Set all the squares along the left edge (x=0) to 'a'.
    Do the same for the right edge.
    Return the changed grid.
    """
    for y in range(grid.height):
        grid.set(0, y, 'a')
        grid.set(grid.width - 1, y, 'a')
    return grid
First of all, let’s be sure we understand what this is doing:
- loops over all the columns in the grid
- sets every cell at the left edge to ‘a’
- (0, y) is a coordinate at the left edge
- sets every cell at the right edge to ‘a’
- (grid.width -1, y) is a coordinate on the right edge
- returns the grid
- very important! this lets us test the function by seeing if the returned grid is correct
Here is a doctest for this function:
>>> grid = Grid.build([['b', 'b', 'b'], ['x', 'x', 'x']])
>>> set_edges(grid)
[['a', 'b', 'a'], ['a', 'x', 'a']]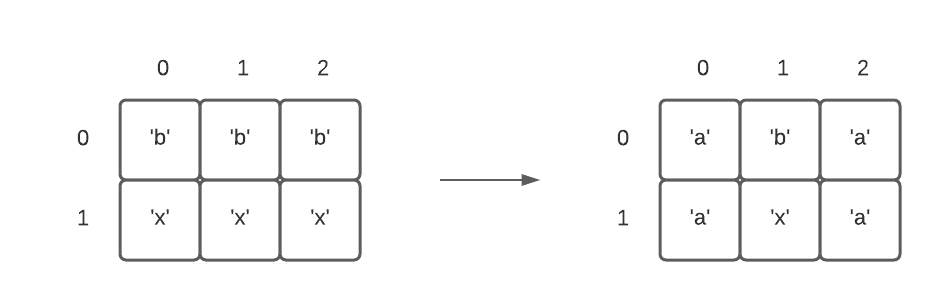
- create a new grid, with two rows
- call
set_edges()with this grid - check the return value by writing a grid, just like you would pass to
Grid.build()
Reminder: Your doctest has to have all the spacing between brackets correct.
Put all of this into PyCharm and run it.
Pseudo random numbers
Computers are deterministic — if you give them some code, they will run it and do the same thing every time. It’s nice to to be able to do some things randomly in computer programs. For example, maybe you want to create random rewards for a video game or simulate what random weather events might do to an airplane.
We usually do this by generating pseudo random numbers meaning they are statistically random but are generated by a computer algorithm.
A good example is the Python random module:
import random

# pick a random number from 1 to 10
random.randrange(10)

# pick a random letter from a string
random.choice('cougars')
Here is a function that puts the string “CS 110” into a random location in a grid:
from byugrid import Grid
import random


def random_cs110(grid):
    # pick a random x coordinate
    x = random.randrange(grid.width)
    # pick a random y coordinate
    y = random.randrange(grid.height)
    # store the string
    grid.set(x, y, "CS 110")
    return grid


grid = Grid(4, 4)
print(random_cs110(grid))
Run this a few times to convince yourself that it is random!
Now … how do we test this function? Every time we run it, it likely has different output!
Reminder
Use random.seed() if you need to test a function using random numbers. The
seed initializes the random number generating algorithm to start at the place
you tell it.
You can write a doctest for this function using:
>>> grid = Grid(2, 2)
>>> random.seed(57)
>>> random_cs110(grid)
[[None, None], ['CS 110', None]]
Calling random.seed(57) sets the random number generating algorithm so that we
always get x = 0, y = 1. Think of the random.randrange() algorithm as being
an infinite sequence of numbers between 0 and the maximum value. The seed
chooses which sequence of numbers to use when you run the program, otherwise
it would pick a random sequence.
Animating the grid
Now we’re ready to create a grid animation! Download movie.zip so you can work with this code yourself in PyCharm. We want to make a movie that has letters from the word ‘cougars’ flying from right to left. Here is a screenshot:

There are two functions we need to fill in for this code, one to create random letters on the right edge of the grid, and one to scroll the letters left:
def random_right(grid):
    """
    Set 10% of the right grid column to random letters from the word 'cougars'
    :param grid: a grid
    :return: the same grid, but with random letters on the right edge
    """
    pass

def scroll_left(grid):
    """
    Implement scroll_left as in lecture notes.
    """
We have provided doctests for both of these, but you should consider adding more.
random right
Let’s start with random_right(grid), which creates random letters on the right
edge of the grid. Let’s write down some pseudocode for this. We can do that with
comments:
# loop through every row

# one out of every times through this loop:

## pick a random letter from 'cougars'

## set the cell at (grid.width - 1, y) to that letter
Once we have comments, we can write the code for this. Let’s try it! (In class, we will do this together.)
…
If we wanted to set every cell on the right edge with a random letter, we could do this:
for y in range(grid.height):
    char = random.choice('cougars')
    grid.set(grid.width - 1, y, char)
return grid
This loops through all the rows, chooses a random letter from cougars, and
then sets the cell in that row, at coordinate (grid.width - 1, y) to hold that
letter. Notice how we have to return the grid once we are done, so we can test
the function.
But we want to do this for only 10% of the cells on the right edge. Remember, 10% is 1 in 10. So we just need to pick a random number between 0 and 9, and then only add a random letter if this value is equal to 0, which will happen 10% of the time. So:
def random_right(grid):
    for y in range(grid.height):
        if random.randrange(10) == 0:
            char = random.choice('cougars')
            grid.set(grid.width - 1, y, char)
    return grid
Try running the doctest, which looks like this:
>>> grid1 = Grid.build([[None ], [None], [None], [None], [None], [None], [None], [None], [None], [None]])
>>> random.seed(86)
>>> random_right(grid1)
[['a'], [None], ['s'], [None], [None], [None], [None], [None], [None], [None]]
Notice how we use the random seed to setup the randomness so that we know we will always get the same answer (‘a’ in the first row and ‘s’ in the third row).
scroll left
Now we can do the second piece, scrolling the letters left. We want to loop through all the cells and check if there are any that are not None. If we find a letter, then we want to move it to the left.
Let’s draw out an example:

Can you write the code for this? (In class, we will do this together.)
…
Here is some solution code:
for y in range(grid.height):
    for x in range(grid.width):
        # get value at (x, y)
        value = grid.get(x, y)
        if value is not None and grid.in_bounds(x - 1, y):
            # move letter at (x, y) to the left
            grid.set(x - 1, y, value)
        grid.set(x, y, None)
Notice we have to be sure to check whether the left cell is in bounds!
Try running the doctest for this.
Important advice
-
Use divide and conquer — break the problem into smaller pieces, solve one piece at a time
-
Test each function separately
-
Don’t try to run the program, look at it how it works (e.g. an animation), and try to fund the bug that way — use doctests for individual functions
-
If a particular function isn’t working as you expect, use the debugger built into Pycharm
Debugging practice
Run the movie-buggy.py version of the code. This has bugs in it. Notice what
it does! You might be tempted to try to figure it out (see the above advice).
Without looking at the solution code, see if you can debug it and find what is wrong. Run the doctests and see what the output is.