
Project 1 — Bit
Complete the following problems.
Setup your environment
To begin, use PyCharm to create a project called project1. You should do all
your work there.
Next, download project-1-files.zip. This is a zip
file, so you will need to extract its contents. You should put the files inside
of your project1 folder. When you are done, it should look like this:
These files contain:
- Python scripts where you will write functions to solve problems. For example,
in the “Go Blue” problem below, you will hand in a file named
go_blue.py, and you will implement thego_bluefunction in this file. - Test files that provide the starting world and finishing world. We will use
these to run tests to be sure you solved the problem correctly. For example,
go-blue-start.txtandgo-blue-finish.txtshow the world as it looks at the start of the problem and how it should look when you finish the problem. You don’t need to turn in the “start” and “finish” files. They are provided as a help to you so you can test your solutions before turning in the project.
Part A: Simple Problems
These problems can be solved with the single, top-level function. No extra decomposition is needed.
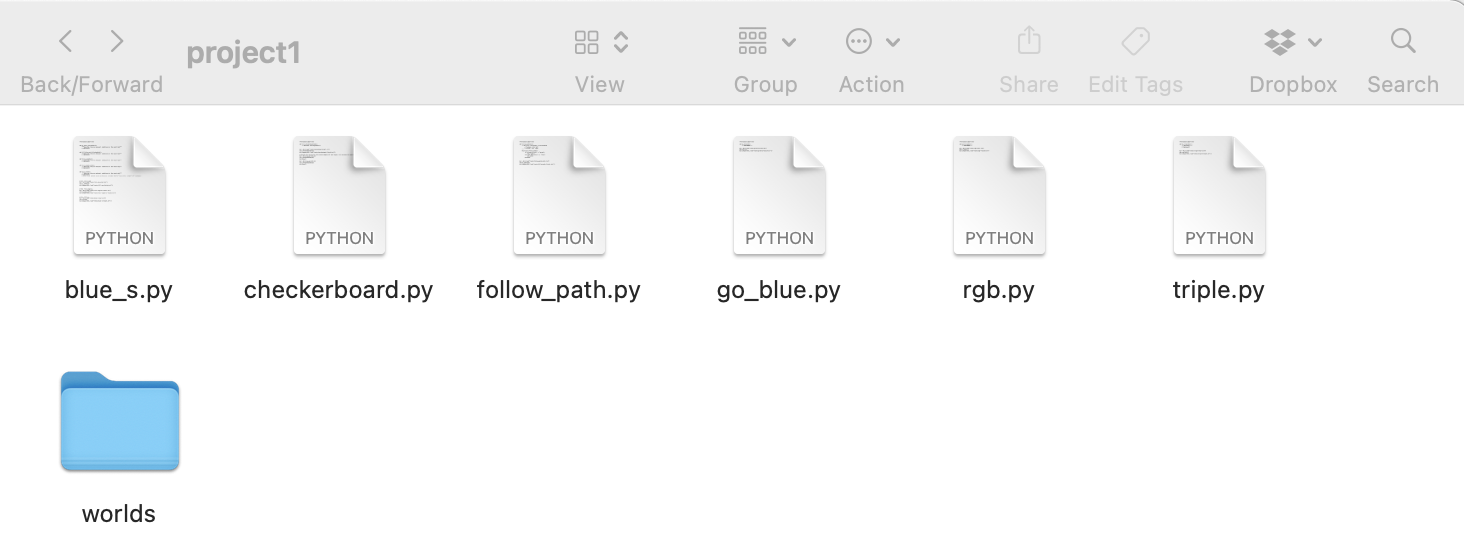
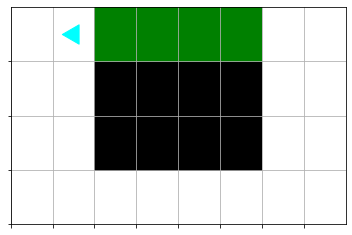
Problem 1: Go Blue
The starting world consists of three rows, like this:

Paint a blue stripe in the middle so the world finishes like this:
Use the go_blue.py file to write your solution, filling in the go_blue()
function.
When you run the script with python go_blue.py, an image will open each time
you call the bit.draw() function. To proceed after this window is opened, you
must close the window. Python will then move on and then execute any additional
lines, such as tests. Our test will open a window comparing your results with
what is expected. Once you close this window, the Python script will finish.
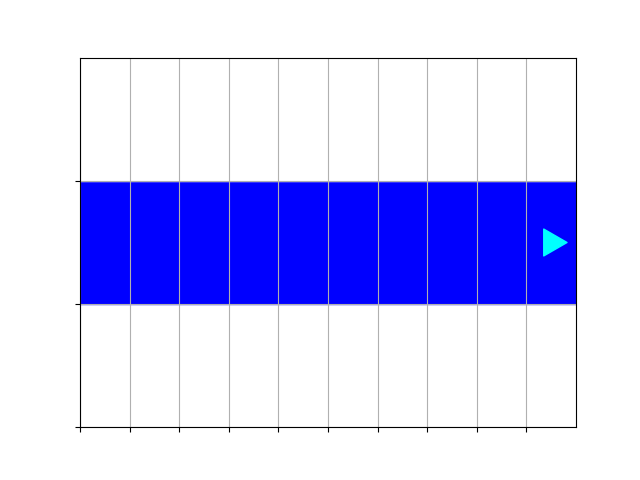
Problem 2: RGB
The starting world consists of three rows, like this:
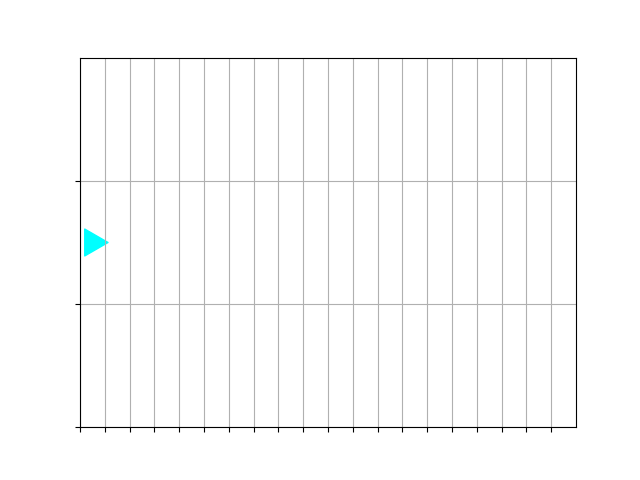
Paint a stripe of alternating colors — red, green, blue — in the middle, so the world finishes like this:
Use the paint_rgb.py file to write your solution, filling in the paint_rgb()
function.
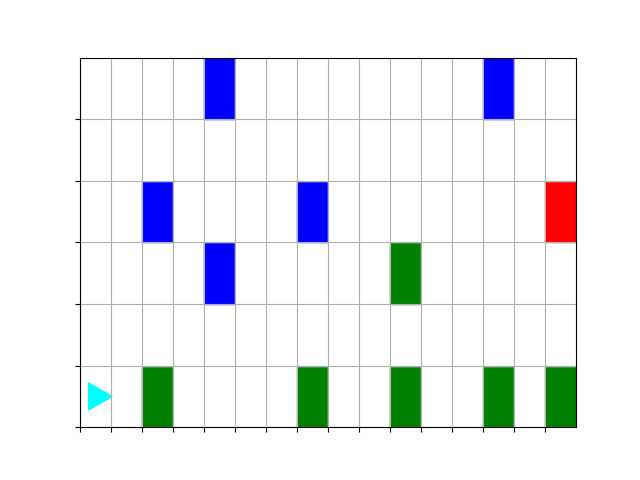
Problem 3: Fix the Bugs 🐛 🪲 🪳
Use the file follow_path.py. In this script, the function follow_path()
should
- Go until a red square is encountered
- Turn left on green squares
- Turn right on blue squares
- Erase any colored squares using
bit.erase()
The starting world looks like this:
Run python follow_path.py to see what it does and then fix the errors.
Part B: Decomposition
These problems will require some decomposition.
You can decompose them however you want, but the top-level function name should remain the same.
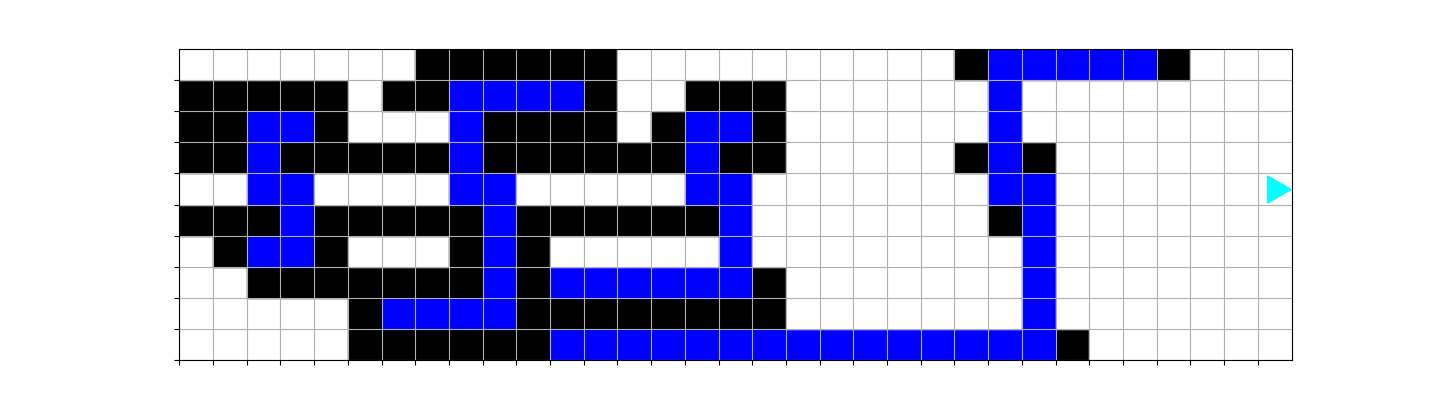
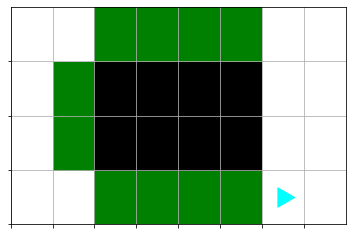
Problem 4: Blue S
The world starts like this:
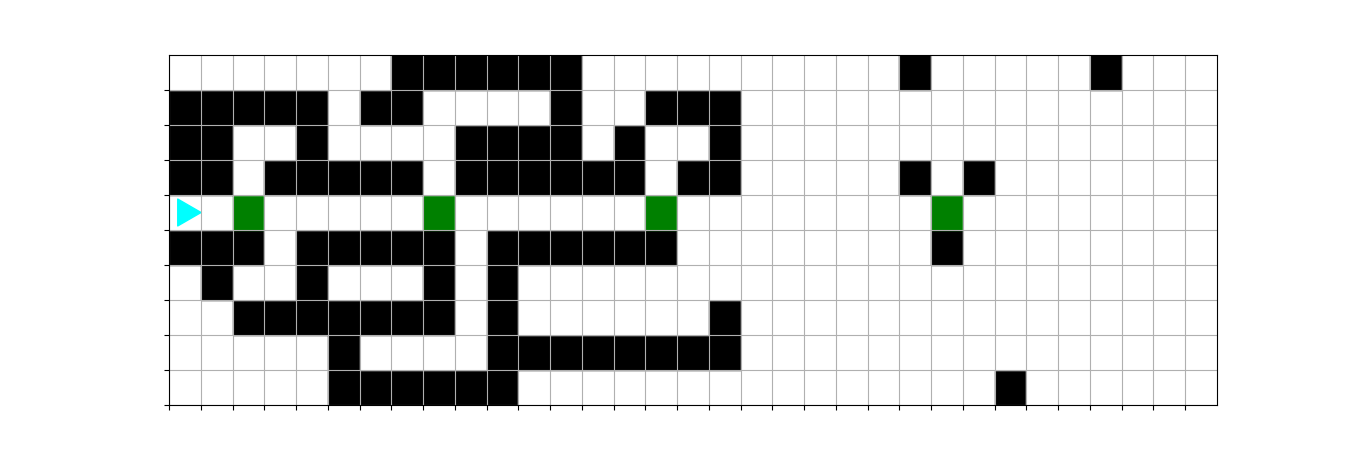
Paint a blue s that is centered on each green square. It should look like this
when finished:
Use the file blue_s.py. In this file you will see the following functions to
implement:
go_until_blocked()— move until you meet a square that is already filledfill_blue_until_blocked()— paint blue until you meet a square that is already filledfill_s_arm()— paint blue to fill in the arm of an s, then move back to where you started (this should work for the top or bottom arm of the s, starting at the middle green square for the top, and the next square for the bottom)fill_single_s()— paint an entire blue s, starting from the green squarefill_ss()— paint all the blue s shapes
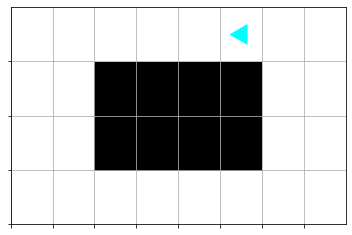
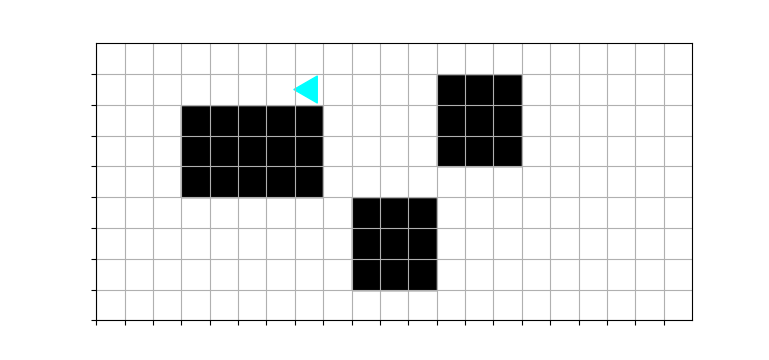
Problem 5: Triple
For this problem, bit starts facing the left side of the world next to a “rectangle” made of 1 or more blocks. The goal is to put green blocks on the first three sides it encounters.
First bit does one “side” move, moving forward while there are blocks to the left, painting squares green. There’s a boundary detail here: paint the squares next to a block green, but not the last square.
Before the side move:
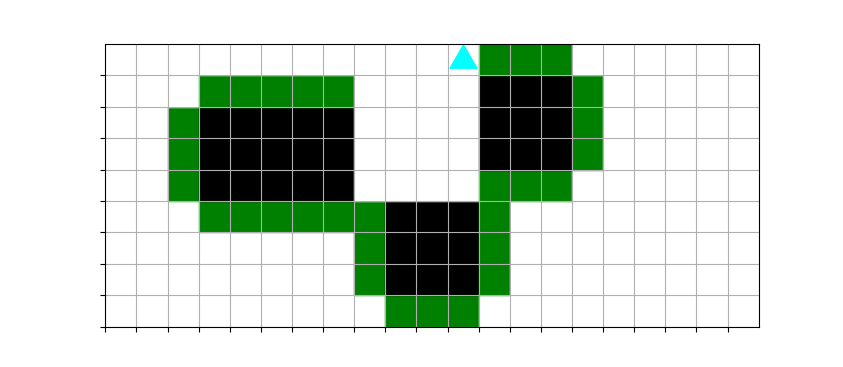
After the side move:
Then, turn left and do another side move. Then do the third side. That completes one rectangle, which looks like this:
The overall “triple” problem is just 3 rectangles put together, with a right turn making the transition to the 2nd and 3rd rectangles.
It starts like this:
And should finish like this:
Use the file called triple.py. The main function for this problem is called
do_triple() and it solves the whole problem. You should create two or more
helper functions to help solve the problem.
Typically, helper functions are written before the main function in the script,
but that’s not a requirement. The import statements should come before
everything else. The pattern demonstrated in the “S” exercise is a good pattern
to follow: import statements, then helper functions, then the main function,
then call the main function.
For each function, document what the function does within the docstring (i.e.
the """triple quotes""") at the top of the function. Be sure to include
details describing the expected pre-conditions and promised post-conditions of
the function.
For the wording of your description, you may assume the reader is familiar with the definitions and terminology of the problem itself.
Your do_triple() function does not need a loop itself since we are promising
that there are exactly 3 rectangles to solve. It should simply call your helper
functions with a pattern to solve the 3 rectangles. However, if you feel up to
the challenge, you can consider how to implement do_triple with a loop.
Suggestion: A common source of bugs in this sort of code is to confuse the
different pre/post conditions for your functions in different parts of the code.
Write your pre/post conditions in the docstring (i.e. the """triple quotes""")
so they are really clear in your mind.
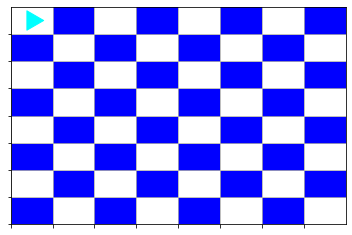
Problem 6: Checkerboard
For this problem, bit starts in the lower left square, facing right. Move bit to the upper left square, filling in all the rows with a checkerboard pattern.
The world at the start:

The world at the end:
Decomposition
It’s helpful to have terms for the two row types. Let’s say the topmost row is type 0, since the blue squares begin right away, and the second row is type 1. You can have a function for each type. Make a little diagram to think through each function.
Your code should be able to solve any size world that is 2x2 or larger, and the world might not be square.
The main function for this problem is called fill_checkerboard() and it solves
the whole problem. As with the Triple problem, create two or more helper
functions to help solve the problem. For each helper function write a
description within the docstring at the top of the function describing what it
does. A clear definition of Bit’s position and orientation in the pre/post
conditions is vital to mesh the functions together.
The skill of correctly, clearly, and concicesly documenting the contract of a function is critical to programming. It takes practice. Don’t be afraid of the effort it takes to provide this documentation.
Here are two suggestions to keep help you get off on the right foot:
-
Re-using Abstractions: Look at the type-1 row. It looks an awful lot like the type-0 row. In fact, the process of drawing a type-1 row is almost identical to the process of drawing a type-0 row (what is the difference?). You could probably call the “draw type-0” function from the “draw type-1” function… 😉
-
No Zig-Zag: It’s tempting to approach this problem with a zig-zag pattern: one row going left-to-right, and the next row going right-to-left, etc.—that’s how you would do it as a person walking around. However as a code algorithm, zig-zag is a disaster! With the zig-zag scheme, type-0 and type-1 rows have different pre/post conditions, facing opposite directions, so it’s very difficult to mesh them together. The algorithm is much cleaner when all the rows are filled in the same direction (recall the “blue ocean” example from lecture). In this way the pre/post conditions for the two row types are uniform, all going the same direction. Do not solve this with the zig-zag pattern; it is much harder to get it to work 😟. Do it like the lecture example 😀.
Test as you go
When building solutions to complex problems, it’s a really good idea to test (and fix!) important building blocks before moving on to the next step.
First test your helper functions. Do they do what you expect? Do they work for different grid sizes?
You can’t test all possible grid sizes, so what grid sizes would make the most sense to test? A good starting place would be any boundaries that are defined in the problem (e.g. “2x2”). Then, consider whether some grid sizes are fundamentally different from others. In this problem, the every-other nature of the checkerboard suggests even and odd sizes may be good to test, but that if it works for one even-sized grid, it will probably work for all even-sized grids.
Once you test your helper functions, work out the transition between calling one function and calling the next. You don’t need a loop yet—just work out the pre and post conditions. Test to see that you can fill two rows correctly without a loop.
Finally, modify your two-row implementation to use a loop and solve the whole problem.
Turning in the project
To turn in the project, go to Canvas, and the Project 1 assignment will have a
button that says Load Project 1 - Bit in a new window. Clicking this button
takes you to Gradescope. Here you can upload your files:
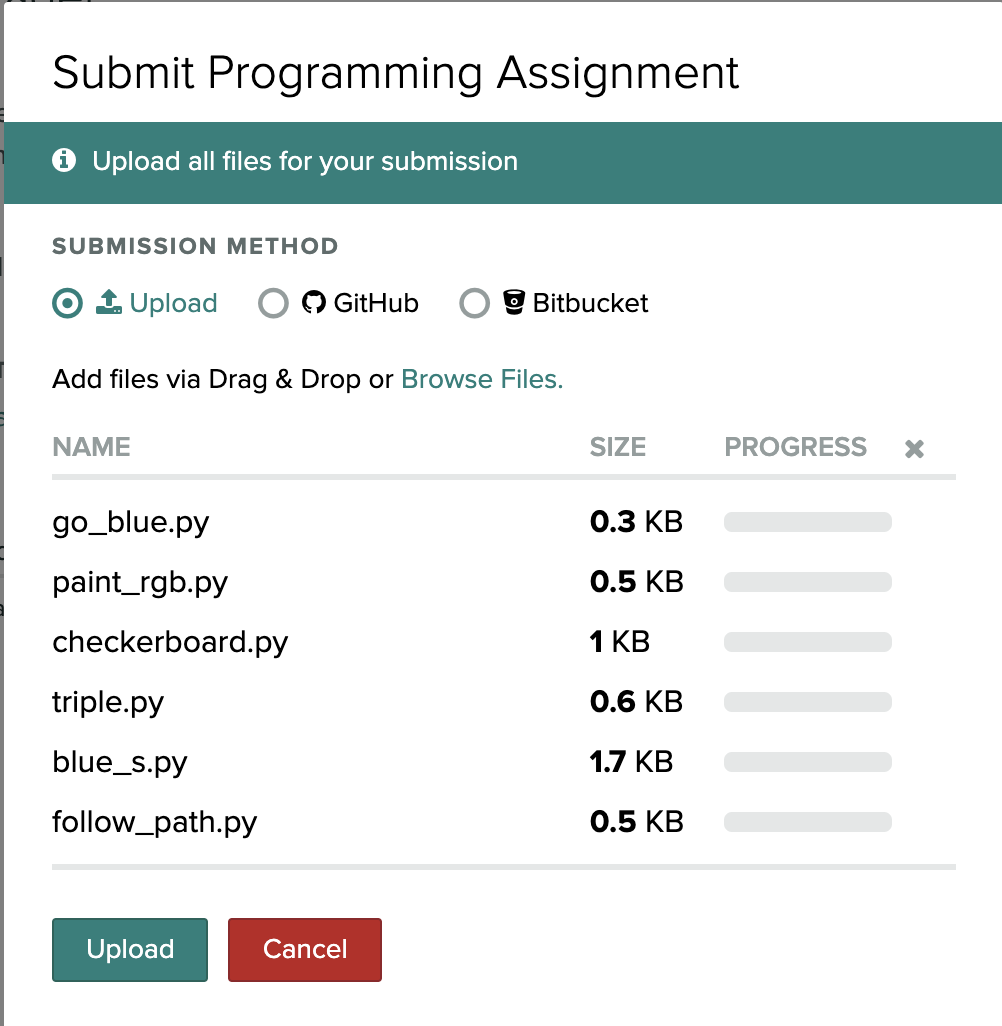
Select just your Python scripts (ending in “.py”) and be sure to include all six files, as shown. Gradescope will then automatically grade parts of your project.
The TA will also look at your code and grade part of your project, as described below. We will then import the scores from Gradescope into Canvas.
Points
| Task | Description | Points |
|---|---|---|
| Go Blue | Your solution works | 1 |
| Paint RGB | Your solution works | 1 |
| Fix the Bugs | Your solution works | 2 |
| Blue S | Your solution works | 4 |
| Triple | Your solution works | 4 |
| Checkerboard | Your solution works for a variety of board sizes | 4 |
| Docstrings | You have docstrings that clearly define what each function does and explain the pre-conditions and post-conditions for each function | 2 |
| Decomposition | You have used decomposition to write small functions that accomplish each piece of a problem | 2 |
The auto grader on GradeScope will grade whether your solution works. The TAs will grade your docstrings and decomposition as follows:
- Docstrings
- 2 points: You have docstrings that clearly define what each function does and explain the pre-conditions and post-conditions for each function
- 1 points: Your docstrings need some improvement
- 0 points: No docstrings or only a few docstrings
- Decomposition
- 2 points: You have decomposed each problem into a set of small functions with well-defined tasks
- 1 point: Your decomposition needs improvement
- 0 points: You have mostly written one long function to solve each problem